Uncategorized
8 Detailed Steps to Install Google Shopping Feed in Magento 2

Jan
If you run an online store, you’ll understand the importance of advertising when customers are searching for desired products in the marketplace. Since Google announced Google Shopping and its free product listing ads, we’re now offering a brief guide on how to set up and optimize your product feed through Magento and Google Merchant Center, specifically the
Google Shopping Feed Magento 2 .
What is Google Shopping Feed?
The Shopping Feed is a detailed list of products along with images, descriptions, and attributes that Google uses to match customers’ search terms to their Google Shopping results. And if you want your products to be displayed, you need to prepare everything because Google will reject all products that don’t follow the guidelines (you may already know this if you’re running paid shopping campaigns).
Since the Google Shopping Feed is now open to free product listings, it’s more important than ever to have a good dataset in your Shopping Feed. By doing so, you’ll help Google better understand your products, and this will help improve your online visibility.
Remember that configuring your feed is never enough, as you’ll need to ensure your feed complies with data quality guidelines by uploading it to Google Merchant Center. Once your product is reviewed and approved, you can start advertising on Google Shopping.
>> See also: Magento 2 Webhook: Detailed guide with example code

How to configure Google Shopping Feed in Magento 2
Now that you understand the basics, let’s move on to the most important part – configuring and optimizing your product feed for the Google Shopping Feed in Magento 2.
Whether you have a custom solution for creating shopping feeds or use a third-party extension, creating detailed product feeds with featured data is extremely important. If you don’t have a feed creation solution on your store, we recommend Rocketweb’s Google Shopping Feed Magento 2 extensions (available for both Magento 1 and Magento 2). These extensions are flexible and easy to use, ensuring the quality of the data provided and structuring shopping campaigns.
When you’re setting up your shopping feed, you must include basic product information such as ID, Title, Description, Google Product Category, etc.
Google Shopping Feed Magento 2: Prices
You need to provide the exact price of your products in your feed to avoid product rejection (or product suspension from Google Merchant Center).
The product price you send via Google Shopping Feed Magento 2 is the minimum price customers are willing to pay for the products. In practice, this means that if you sell certain products in bundles and customers can’t buy just one, your feed should show the price per bundle (not per product). Additionally, the same amount will be the most prominent price on your landing page and microdata markup.

If you want your ads to display the price per unit, include [unit_pricing_measure] and [unit_pricing_base_masure] in your feed.
>> See also: 5 Most Popular and Effective Sales Strategies for All Businesses
Google Shopping Feed Magento 2: Price [sale_price]
Many businesses don’t include pricing attributes in their feeds, and this causes quite a bit of trouble in their Google Merchant Center accounts. Why? Because Google sees different prices on your landing pages compared to the pages you’ve submitted in your feed.
That’s why we can emphasize enough the importance of always keeping the same price in the feed as it’s displayed on the landing page and microdata markup.
Google Shopping Feed Magento 2: Shipping Weight
Although this field is optional, if you are using any shipping method that depends on product weight, you need to include it in your shopping feed.
Google Shopping Feed Magento 2: Brands
Adding a brand to your product feed is mandatory for most new products. The rules are simple: submit the brand attribute of the products you’re selling through Google Shopping Feed Magento 2, or if you don’t have a brand assigned to the product, submit the manufacturer attribute instead.
Remember that you should never impersonate a brand name in your feed. If you are selling replicas or products compatible with original manufacturers, then you should not submit that manufacturer’s brand name to your feed.
Google Shopping Feed Magento 2: GTIN & MPN [gtin, mpn]
The Global Trade Item Number (gtin) is a required field for all products with a manufacturer-assigned GTIN. If you do not have a manufacturer-assigned GTIN, you can submit the Manufacturer Part Number (mpn).
If your products lack their unique identifiers (or GTIN or brand and MPN), be sure to assign the value “no” to the [identifier_exists] field in your feed.
![Google Shopping Feed Magento 2: GTIN & MPN [gtin, mpn]](https://magenest.com/wp-content/uploads/2021/10/google-shopping-feed-magento-2-3.jpg)
Google Shopping Feed Magento 2: Other values [color, size, gender, etc.]
Depending on the product, you may need (or want) to include additional details in your feed such as color, size, gender, etc.
All of this will help Google better understand your product and allow you to compete on Google Shopping, as well as help you configure your paid Google Shopping campaigns.
Before you begin adding these values to your shopping feed, double-check the product specifications to ensure accuracy. You can also add some useful attributes of your own choosing.
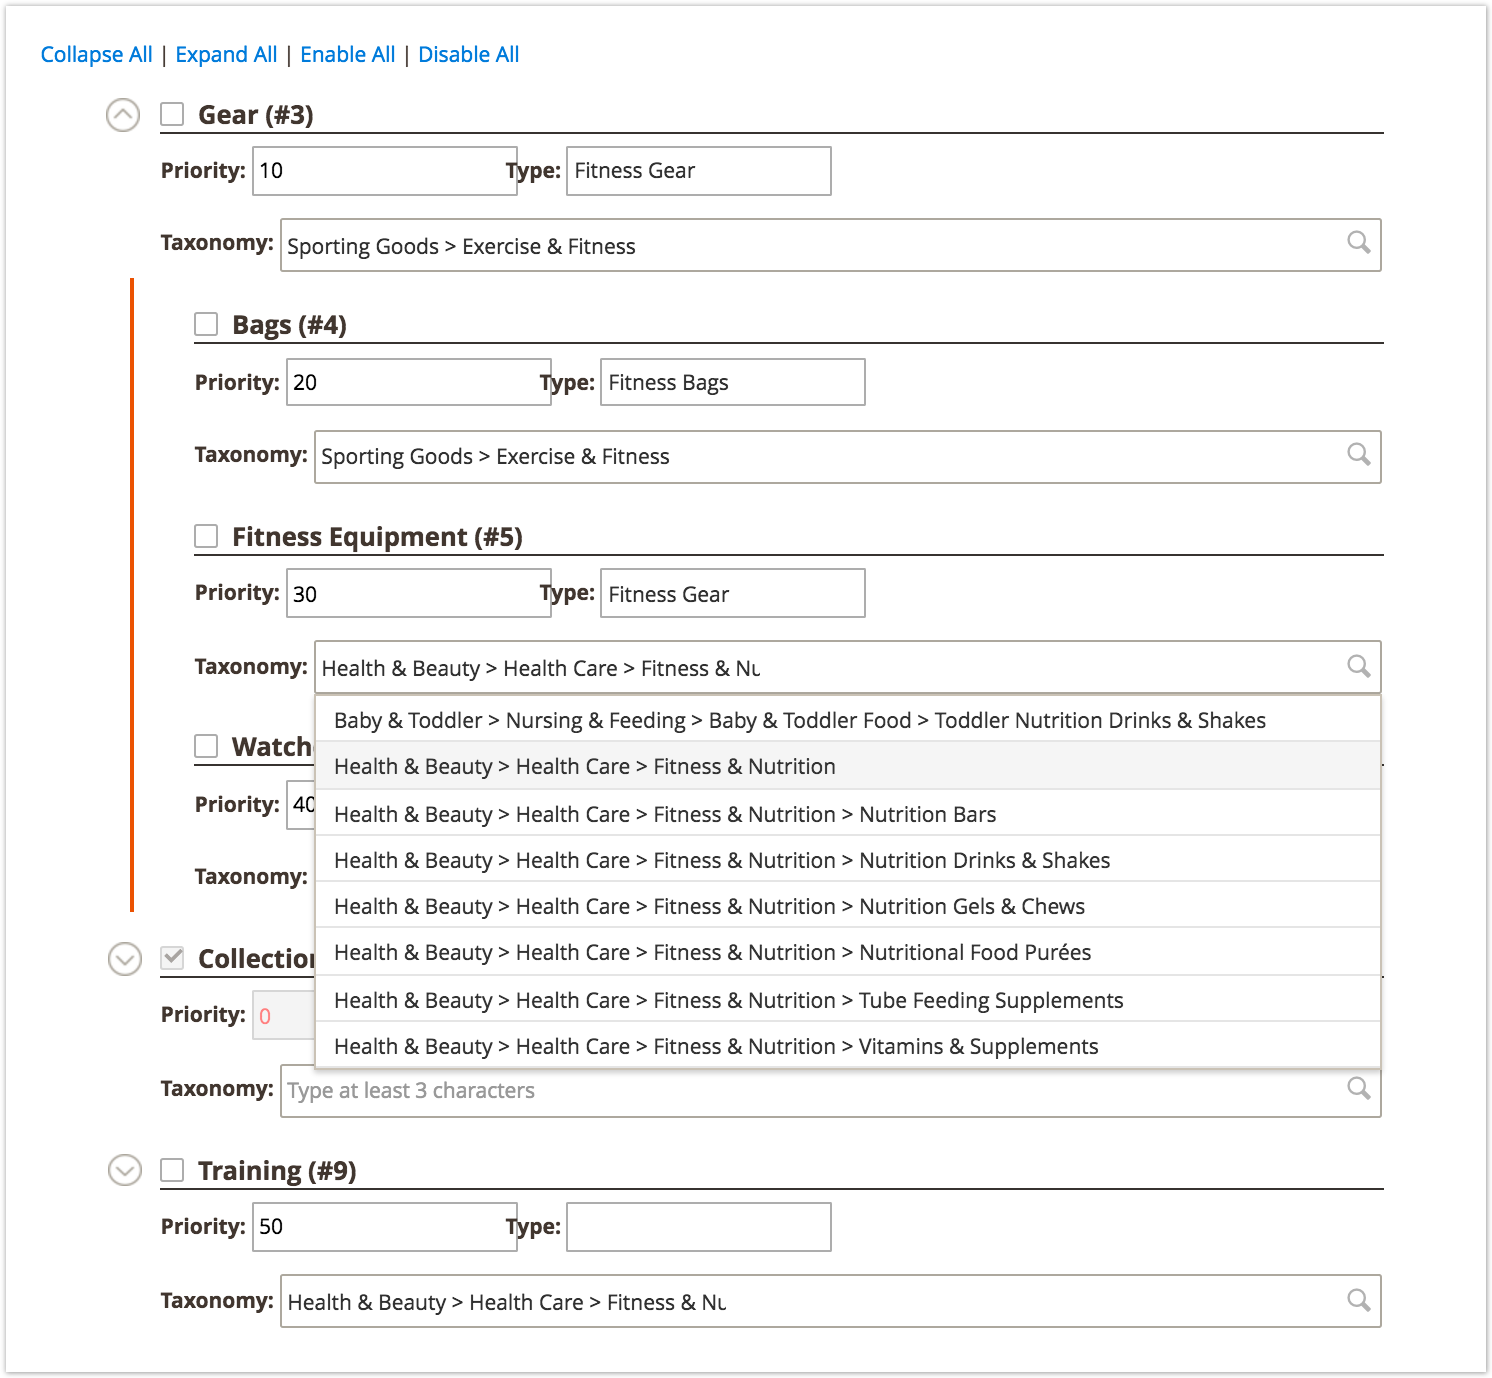
Google Shopping Feed Magento 2: Custom Labels [custom_label_0]
You’ve decided on a specific structure for your shopping campaigns, but you can’t segment the data the way you want with all the available attributes? Then add custom label fields to your product feed!
Whether you want to personalize your campaigns with price groups, product group codes, or anything else, you can do it through custom labels. You can add up to five custom labels per feed, so use them wisely.
Once you’ve finished configuring the feed, creating the feed, and setting up an automatic creation schedule, you can then move on to the next steps.
Setting up a Google Merchant Center account
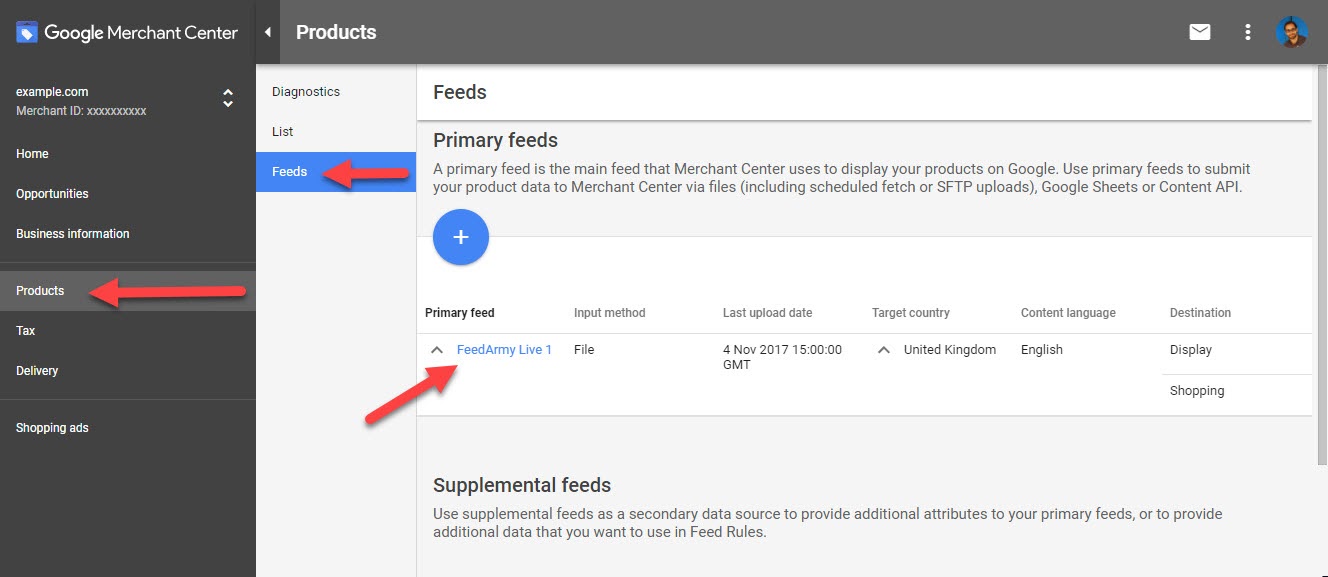
After configuring the feed, we’ll move on to setting up Google Merchant Center. If you’re already using Google Merchant Center, you can skip this step, but if you’re new to shopping campaigns, keep reading to learn how to set up your account.
Sign in to Google Merchant Center (GMC) with the same Google account you use for Google Ads. Once you’ve signed up to GMC, add your business information, verify your website, and fill in the rest of the information through a few tools (like shipping rates and taxes), opt in to the Google Merchant programs you’re interested in, and upload your product feed.
How to check if your product feed complies with Google’s policies.
Download your new product feed and upload it to Google Merchant Center as a test feed. After a few minutes, Google will generate a test feed report, and you can see if there are any issues that need to be addressed before you upload your (actual) Google Shopping feed to GMC.
Once you’re sure the data in your feeds is accurate and aligns with Google’s recommendations, add new product feeds to Google Merchant Center, opt into the Surfaces Across Google program to participate in Google Ads campaigns, and schedule your data sources.
What happens if Google Merchant Center doesn’t accept the values you set for specific properties?
Because Google has strict guidelines regarding product data, and the attribute values in your Magento store may not comply with Google’s policies, you may need to adjust your feed to comply with Google’s guidelines.
If you’re using Rocketweb’s shopping feed, you can do this directly in the extension with the Find & Replace feature on the Product Filter. If you’re using a different solution that doesn’t have that option, you can address those issues in GMC.
To do this, access your feed in GMC and select “Feed Rule” in the upper right corner, and then create a rule for the attributes (and values) you want to adjust.
Because configuring Merchant Center rules is a broad topic (and this article is already quite long), we won’t go into detail here and will leave it for a later section, where we’ll show you how to optimize your Google Shopping feed with Merchant Center feed rules.
Once your feed is ready and your products are approved, you’re ready to start running advertising campaigns on Google Shopping.
